Megan Brooker: Wesleyan School

|
Meagan Brooker is the Assistant Director of Fine Arts and Art Teacher at The Wesleyan School. She has been teaching visual art for 15 years. At Wesleyan, she teaches many different media including drawing, photo, painting, and mixed media. She is also a practicing artist who works on commissions, and photography in her “free time”. She is also a proud mother of two boys. Meagan feels, “...thankful that I teach a lot of different media because I truly enjoy all of them! And my favorite part of teaching is that it creates the necessity to always be learning something new!”
"When I stand before God at the end of my life, I would hope that I would not have a single bit of talent left and could say "I used everything you gave me." - Erma Bombeck Website: https://meaganbrookerphotography.pixieset.com/ Email: [email protected] |
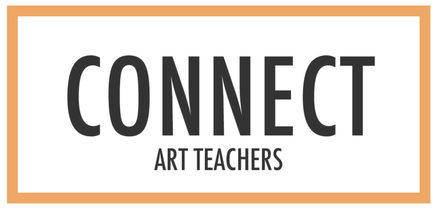
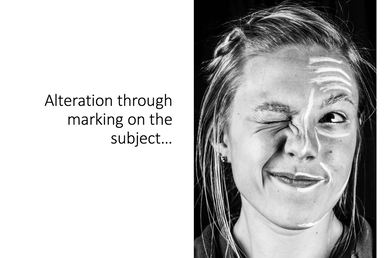
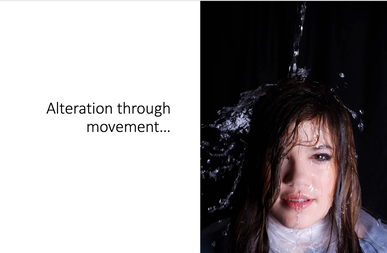
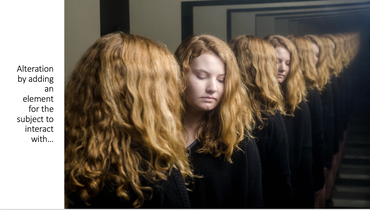
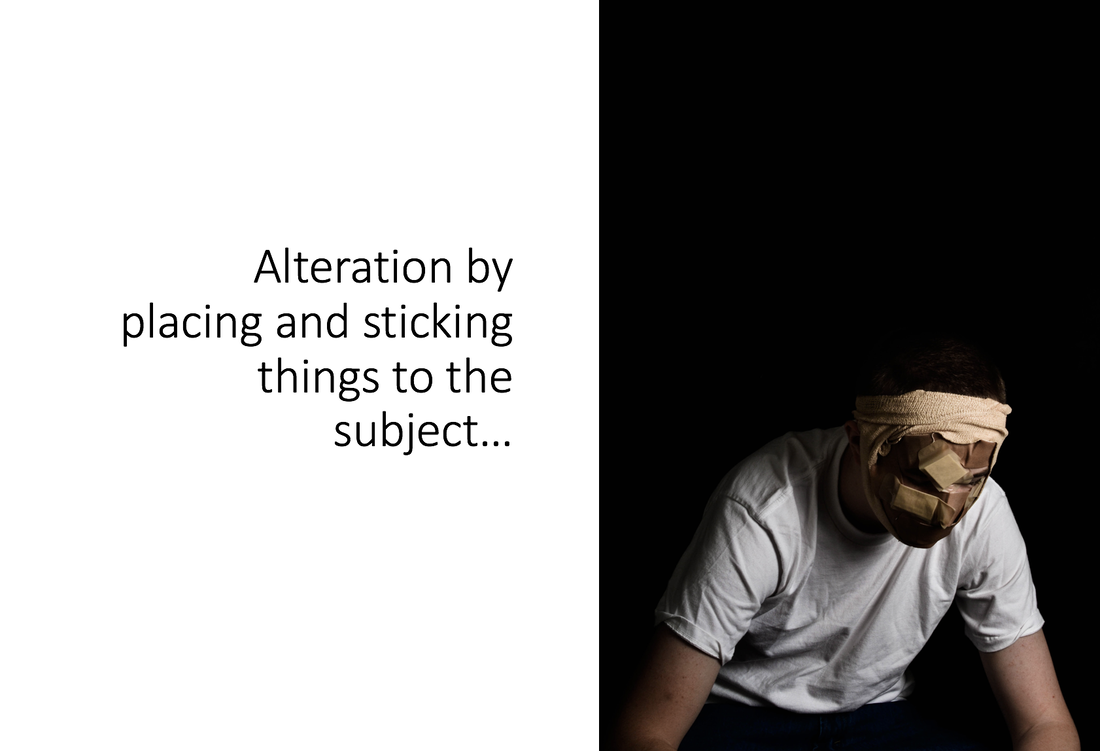
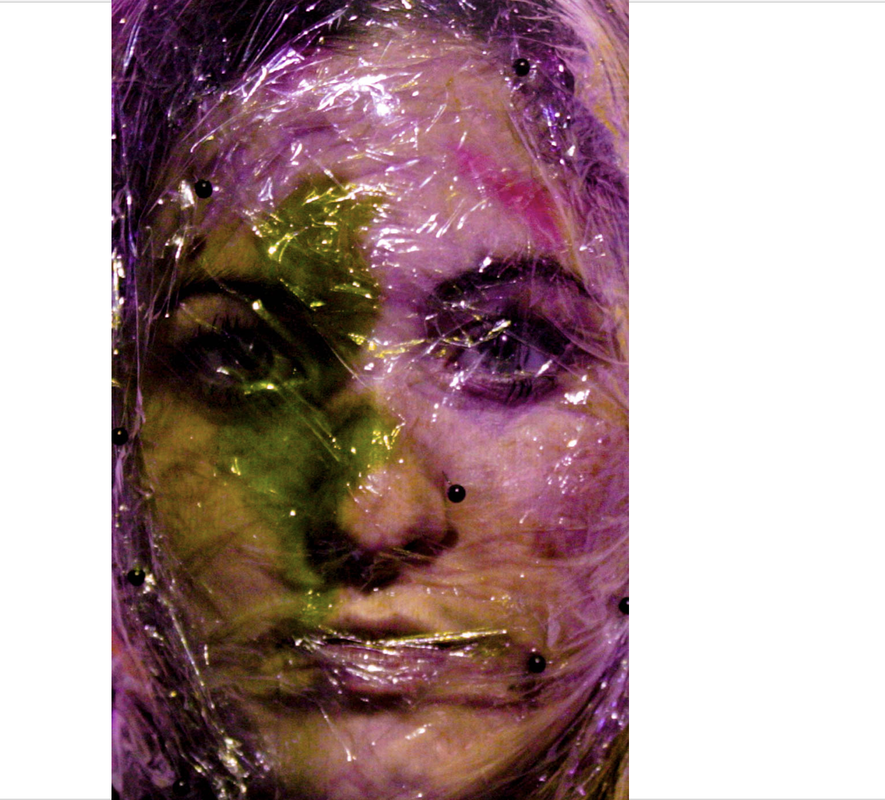
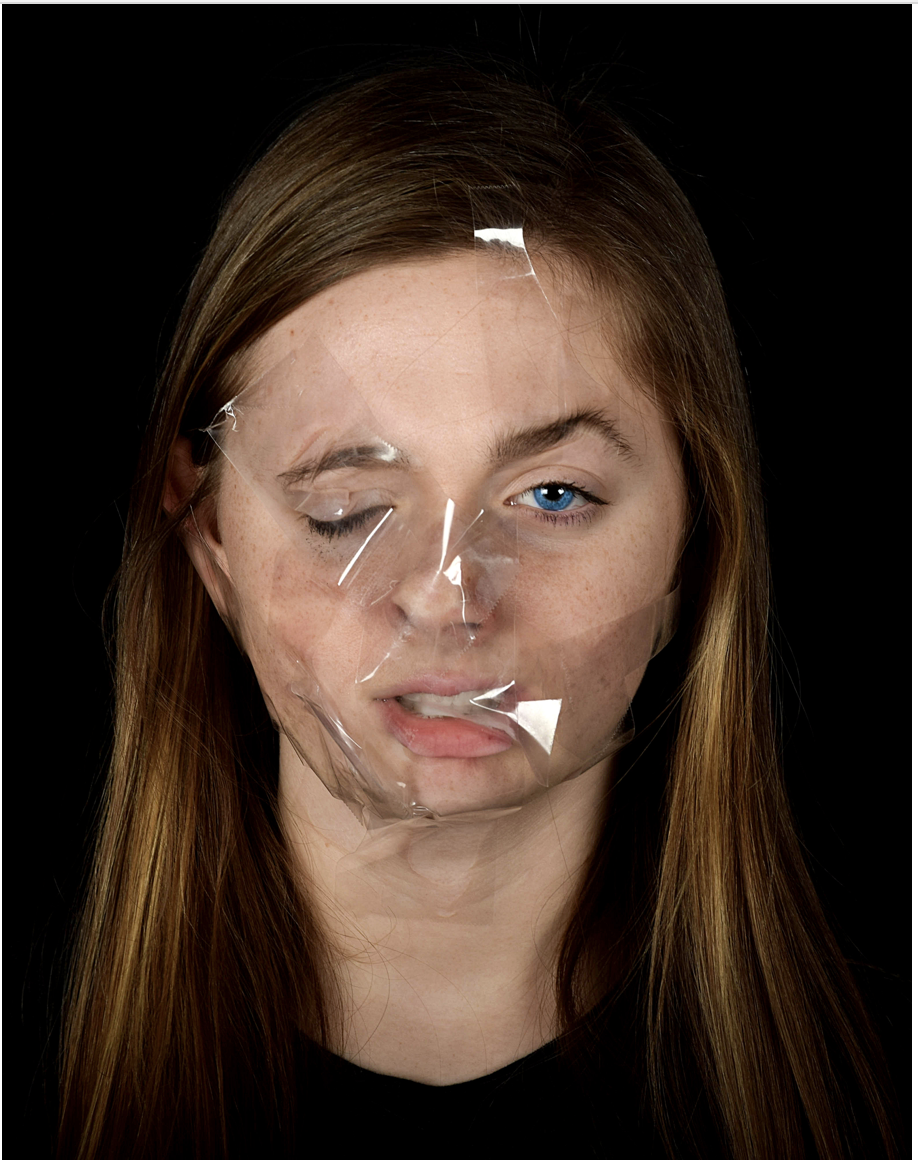
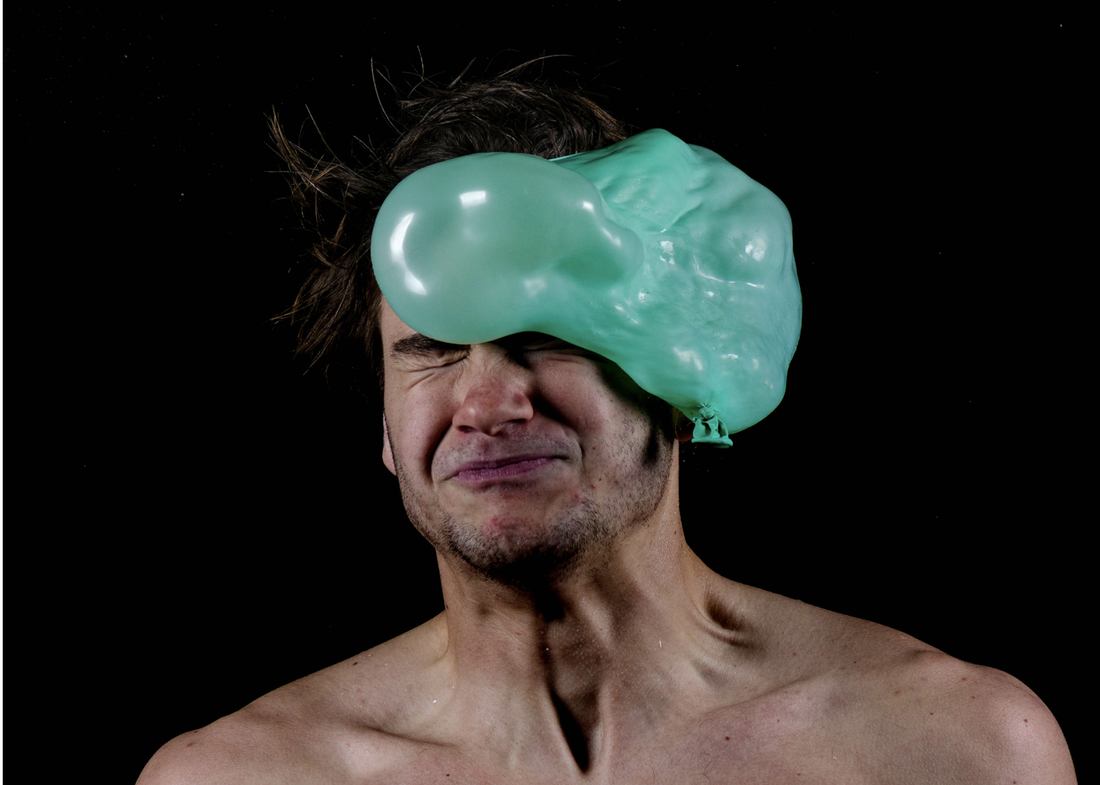
Portrait Photography with a Twist BIG IDEA: Portrait photography with a twist
|
|

| altered_portrait_rubric.pdf |
| altered_portrait_photo_lesson_plan.pdf |
Portrait Photography with a Twist BIG IDEA: Portrait photography with a twist
ESSENTIAL QUESTIONS: What is portrait photography? How does lighting impact your subject? How can you alter the subject in the portrait to put a modern spin on it?
OBJECTIVES: Students will… Look at and discuss work by Wes Naman. Further research work by Wes Naman individually. Develop an idea for an altered portrait, capture it, and edit it. Print or digitally submit photographs for grading. Participate in a critique of the photographs.
STANDARDS: http://www.nationalartsstandards.org/ Middle School:
ART: 6th grade: Visual Arts/Creating:
VA:Cr2.1.6, Demonstrate openness in trying new ideas, materials, methods, and approaches in making works of art and design.
Visual Arts/Responding: VA:Re9.1.6, Develop and apply relevant criteria to evaluate a work of art.
7th grade: Visual Arts/Creating: VA:Cr1.2.7, Develop criteria to guide making a work of art or design to meet an identified goal.
Visual Arts/Creating: VA:Cr2.1.7, Demonstrate persistence in developing skills with various materials, methods, and approaches in creating works of art or design.
Visual Arts/Responding: VA:Re9.1.7, Compare and explain the difference between an evaluation of an artwork based on personal criteria and an evaluation of an artwork based on a set of established criteria.
8th grade: Visual Arts/Creating: VA:Cr1.1.8, Document early stages of the creative process visually and/or verbally in traditional or new media.
Visual Arts/Creating: VA:Cr2.1.8, Demonstrate willingness to experiment, innovate, and take risks to pursue ideas, forms, and meanings that emerge in the process of art-making or designing.
Visual Arts/Responding: VA:Re9.1.8, Create a convincing and logical argument to support an evaluation of art.
High School:
ART:
Proficient:
Visual Arts/Creating: VA:Cr1.1.HSI, Use multiple approaches to begin creative endeavors.
Visual Arts/Responding: VA:Re8.1.HSI, Interpret an artwork or collection of works, supported by relevant and sufficient evidence found in the work and its various contexts.
Visual Arts/Presenting: VA:Pr.4.1.HSI, Analyze, select, and curate artifacts and/or artworks for presentation and preservation.
Visual Arts/Responding: VA:Re9.1.HSI, Establish relevant criteria in order to evaluate a work of art or collection of works.
Accomplished:
Visual Arts/Creating: VA:Cr1.2.HSII, Choose from a range of materials and methods of traditional and contemporary artistic practices to plan works of art and design.
Visual Arts/Creating: VA:Cr2.1.HSII, Through experimentation, practice, and persistence, demonstrate acquisition of skills and knowledge in a chosen art form.
SUPPLIES: Computer and projector for presentation Adobe Photoshop (or similar photo editing software) Printed worksheets Pencils and pens Scissors DSLR cameras Studio lights (reflectors, flash head, light stands) Flashes for cameras (if available. The flashes on the cameras can be used) Reflectors or white poster board The below items are optional. If you don’t have the means to print the photographs, the images can be submitted digitally, and projected or pulled up on computer screens for the critique. Printer that can print on photo paper Photo paper Mounting supplies to mount the printed images (matboard, poster board, etc.)
PRINTABLES: Photoshop Basics Altered portrait project activity handout Altered portrait project rubric Critique sheet Critique labels Manual Mode cheat sheet handout
BONUS Altered Portraits presentation
RESOURCES: https://wesnamanphotography.com/ https://www.pinterest.com/whitneywpanetta/look-wes-naman/ https://www.techradar.com/how-to/photography-video-capture/cameras/studio- lighting-4-seriously-simple-lighting-techniques-to-try-at-home-1320828
VOCABULARY:
Elements of photography: Successful photos rely on order, and the main elements that bring and emphasize order in a photograph’s composition are: line, color, shape, contrast, emphasis, texture, and space.
Line: Used in photographs to move your eye around the image, lead your eye to the focal point, create texture, pattern, and emphasis.
Color: Used in photographs to create emphasis, variety, and interest.
Shape: Used in photographs to create pattern, repetition, unity, and variety. Distinguishing shapes are shapes that are isolated and as a result, emphasized. Overlapping shapes creates repetition and a sense of unity in the photograph.
Contrast: The arrangement of opposite elements (light vs. dark colors, rough vs. smooth textures, large vs. small shapes, etc.) in a piece so as to create visual interest, excitement and drama.
Emphasis: Used to help bring your eye to the focal point. Emphasis can be created through positioning, focus, depth of field, and framing the subject matter.
Texture: Used in photography to help different subjects stand out from each other, create unity and variety and add interest.
Space: Used in photography to create a sense of depth, frame the subject matter, and help define the focal point.
Elements of art: The building blocks of a work of art. The visual components of color, form, line, shape, space, texture, and value. Principles of design: describe the ways that artists use the elements of art in a work of art. Includes: balance, emphasis, movement, proportion, repetition, pattern, rhythm, contrast, unity, and variety.
Composition: In the visual arts, composition is the placement or arrangement of visual elements in a work of art. The term composition means 'putting together' and can apply to any work of art, from music to writing to photography, that is arranged using conscious thought.
Rules of composition: Guiding principles to help create successful photographs. Includes the rule of thirds, balancing elements, leading lines, viewpoint, inclusion and exclusion.
Rules of thirds: Placing the focal point of the photograph in one of the third sections rather than directly in the center.
Aperture: A part of a lens that controls the amount of light that enters the camera and as a result, the depth of field.
F-stop/f-number: a camera setting corresponding to a particular f-number, which is determined by the ratio of focal length to the aperture diameter. The f-number represents the aperture setting.
Depth of field: the distance between the nearest and the furthest objects that give an image judged to be in focus in a camera.
Shutter speed: In photography, the length of time for which a shutter is open at a given setting.
ISO: Can change the lightness and darkness of a photograph while capturing it. Low ISO numbers mean the image will be darker and crisper, high ISO numbers mean the image will be bright but more grainy.
Manual mode: Full control over the digital camera settings. You are able to change the aperture, shutter speed, and ISO without the camera trying to interfere with the settings.
Portrait photography: a photograph of a person or group of people that captures the personality of the subject by using effective lighting, backdrops, and poses.” https://en.wikipedia.org/wiki/Portrait_photography
Directional lighting: lighting from just one direction to create contrast and drama.
Ambient light: available light, before any other light sources are added, typically natural light.
Soft-light: In-direct lighting.
Key light: The main light in studio lighting.
Softbox: A light placed behind a white screen with black sides. As the light moves through the white screen it diffuses the light to a soft, even light, similar to light coming through a window.
Honeycomb grid: A light modifier that helps narrow the light into a tight beam.
Fill light: Used to fill in light. This light is equal to or slightly darker than the key light. It is meant to help fill in shadows, not remove them.
Hair light/Separation light/Kicker light: Used to illuminate the hair of the model. This is especially helpful when your model is on a dark background, it helps separate them from the background.
Background light: Used to illuminate the background behind the model. Several may be used and they should be equal or slightly darker than the key light.
Rembrandt lighting: A more dramatic lighting that illuminates a triangular portion of the face leaving a portion in shadow. Place the key light at a 45 degree angle at about 6 feet, placing it above the model. You can use a reflector on the opposite side of the model to help soften the light.
Clamshell lighting: Used to create even lighting on a model and capture more detail. Place softboxes on either side of your model. Equal distance from your model. For even more even lighting have your model hold a reflector under her face to bounce light back onto his/her face. Make sure this is out of the photo frame
Backlight: Light placed behind the model to illuminate the model for a dramatic look that creates more depth. Use a honeycomb grid behind the model, directed at the camera.
Rim style: Place two lights slightly behind the model, directed towards the camera. This will create greater definition in the model’s face.
IMPLEMENTATION: For a 50 minute class, times may vary.
DAY 1:
-Introduction Start class by showing the altered portrait photography presentation.
-Encourage students to participate in a class discussion as you go through the slides. Tell them they need to take notes.
-Look at work by Wes Naman.
-Go through images on Pinterest and get student reactions. Watch the YouTube video of him talking about his work.
-Explain their assignment and go through examples of different ways they can add a twist to a typical portrait. --Remind them of manual mode settings and how to check their f-stop and shutter speed numbers to record in their sketchbooks to remember their favorite settings.
-Go through grade expectations their to do list and take any questions. Pass out the Wes Naman research sheets and have them work on them for the rest of class.
-Once they finish, have them turn them in for a participation grade.
-They can start on listing and sketching out ideas for their altered portraits.
-They can select who they want to photograph from class. You can partner them up or assign everyone a different person in class. Whether you assign who they photograph or allow them to pick their model may be on a class by class basis.
-Photographs will be due at the end of the week, the end of class Friday will be reserved for a class critique. Have them clean up the last few minutes of class
DAY 2-4:
Take and Edit Pictures At the beginning of class pass out the Photoshop Basics worksheet. Do this step if you have not previously gone over Photoshop basics. Disregard if this was already covered. If possible, screen cast your computer as you go through the worksheet and point out where tools are located and how to use them.
-Warn students to not push their pictures too far.
-They should not look like they have filters applied to them.
-They should have a nice balance of color, contrast, highlights, and shadows.
-Take questions as they come up. Emphasize that they need to have good exposure in their portraits, this a part of their grade.
-They need to be careful not to accidentally overexpose their images while editing.
-They can add alterations to their portraits in post production, but they still need to include some type of alteration before they capture their picture.
-After the Photoshop tutorial, hand out supplies and let the students get started on their pictures. Explain that they will have time in class today and the next three days to take pictures, upload, and edit them. They need to allow enough time to upload the pictures they take today to their computers. Pass out their assignment sheet, cameras, and other supplies and send them out to start photographing. Remind them to behave themselves while they are outside of the classroom.
-Before this assignment contact your administrators for approval and notify the other faculty members that students will be working outside of the classroom. Ask them to report any misbehavior and deduct points from their grade if anything is reported. Students have the remainder of class to take pictures.
- Once they are finished taking their pictures they need to come back, upload their images, and start editing. Float and help students one on one. The last five minutes of class allow students to clean up.
DAY 5:
Finish Editing, Critique, and Submit Have students wrap up editing and preparing their photographs for printing or digital submission. Submission options will vary.
-Select the one that makes the most sense to your set up. For this assignment, ideally, have students print their final photograph and hang them up to critique. Or have students drop their completed folders into a shared drive on your school’s network. Or have students save them on a thumb drive to turn into you.
-Upload their pictures to your computer for grading, and return their thumb drive to use on the next assignment. Or have students upload their photographs to a website such as Flickr. They can create a private profile used only for this class, or you can create a class profile and grant all students access to it. If using Google Classroom and Adobe Spark have students post their final photograph to their Spark page, write their reflection, and share their assignment to the Google Classroom Altered Portraits assignment. This is the most streamlined option.
In order to submit their photographs they need to pick their final picture and pick the following:
If printing: Have students print their final photograph on photo paper. Walk them through the process of selecting the correct printer, sizing their image to their photo paper, and printing. Once they are printed, they need to mount them on poster board for the critique and submission. If digitally submitting: Rename the pictures with the topic and save all their pictures in a folder titled Your Name-Altered Portrait Project. For the critique, have the students pull their photographs up on the computer.
Halfway through class have students put up their photographs for a critique.
-Pass out the critique worksheet, explain the process: They will fill out a worksheet to help guide them through looking at the artwork. They will label their favorite photograph in each group. Once the students are finished, start a verbal critique.
-Discuss why they put certain labels on photographs.
-Select the best examples of each topic to discuss. At the end of the critique have the students turn in their critique sheets for a participation grade and their portrait photographs for a project grade.
-If having students complete notes and reflection in their sketchbooks, collect them for a participation grade. If having studio post to their Spark website, check the reflection there for a participation grade.
Patty Zeitz- Kings Ridge Christian School
|
Patty Zeitz is the art teacher Kings Ridge Christian School. She teaches Visual Arts and also directs an Independent Art classes. During Patty's 19 years at Kings Ridge she has played an important role in designing the K-12 visual arts curriculum as well as the rooms and spaces for art class. Patty also has enjoyed writing and directing the K-12 Kings Ridge Christian School Visual Arts curriculum. In the curriculum she has also helped incorporating technology into art project instruction. Patty is an enthusiastic teacher who loves to share with her students different artists that inspire her. One particular artist that inspires Patty is Rosiland Radans, the author of Art Talk. Her book and friendship with this artist has strengthened her abilities in the classroom. She believes that every student has creative abilities inherent in their being.
• AATA CONFERENCES • CONTINUED EDUCATION COURSE AT ATLANTA COLLEGE OF ART AND DESIGN • POTTERY CLASSES EVERY SUMMER FOR 5 YEARS AT ROSWELL WEST • GOOGLE TRAINING WORKSHOP • LAKEVIEW TECHNOLOGY WORKSHOPS • VARIOUS WEBINARS OVER THE YEARS • GEORGIA ART EDUCATORS ASSOCIATION • NATIONAL ART EDUCATORS ASSOCIATION • HIGH MUSEUM OF ART • NATIONAL ART HONORS SOCIETY She also presented at the Torrence Center for Creativity, “Eyes on the future” trying to encourage parents of gifted students to incorporate the arts into their student’s education. https://www.cyberadventures-anartistictwist.com/ [email protected] "I believe every student has creative abilities inherent in their being." Patty Zeitz |
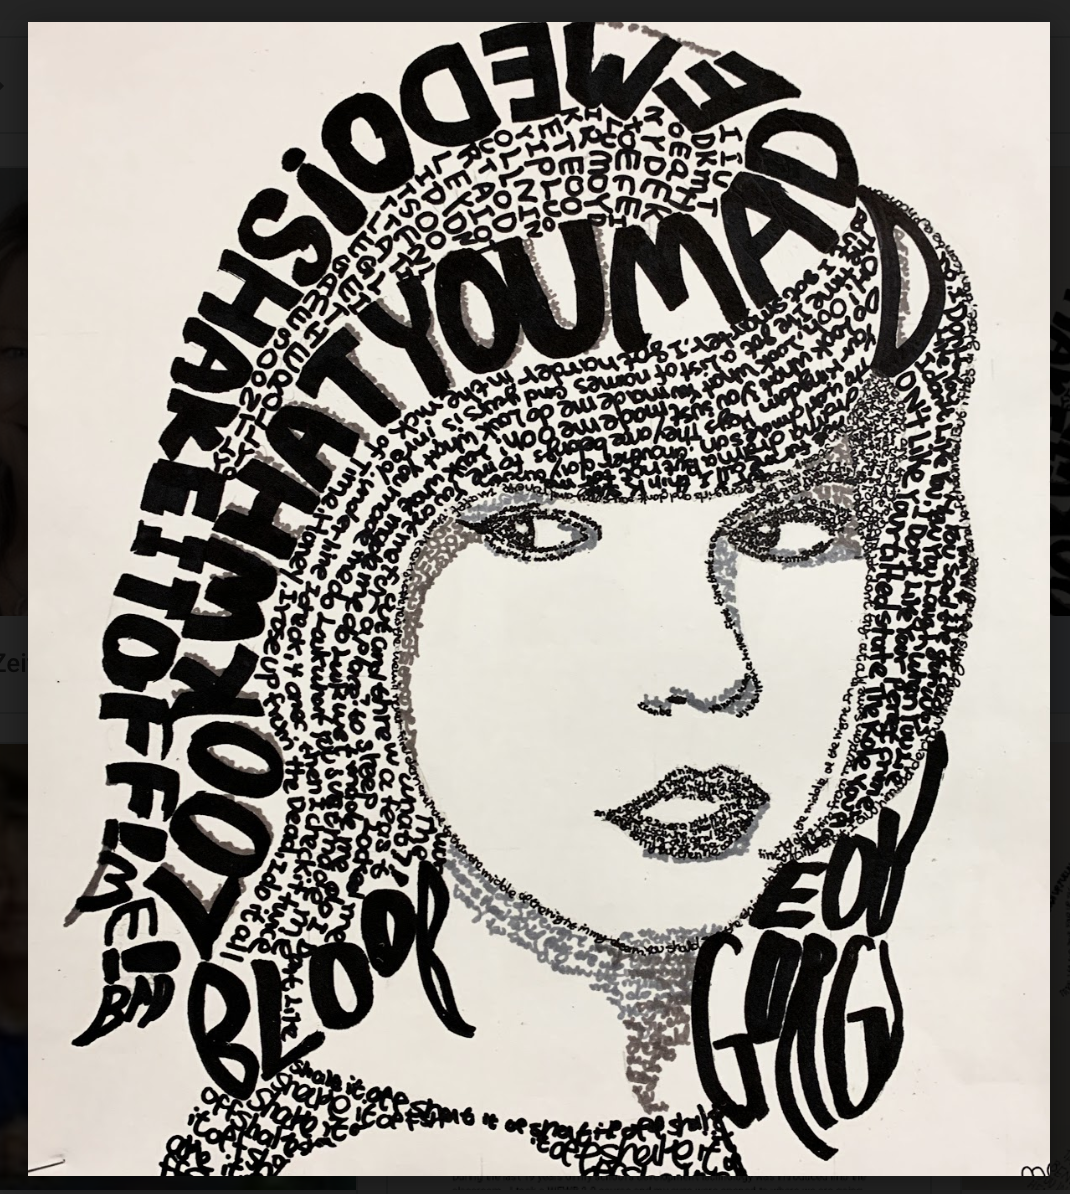
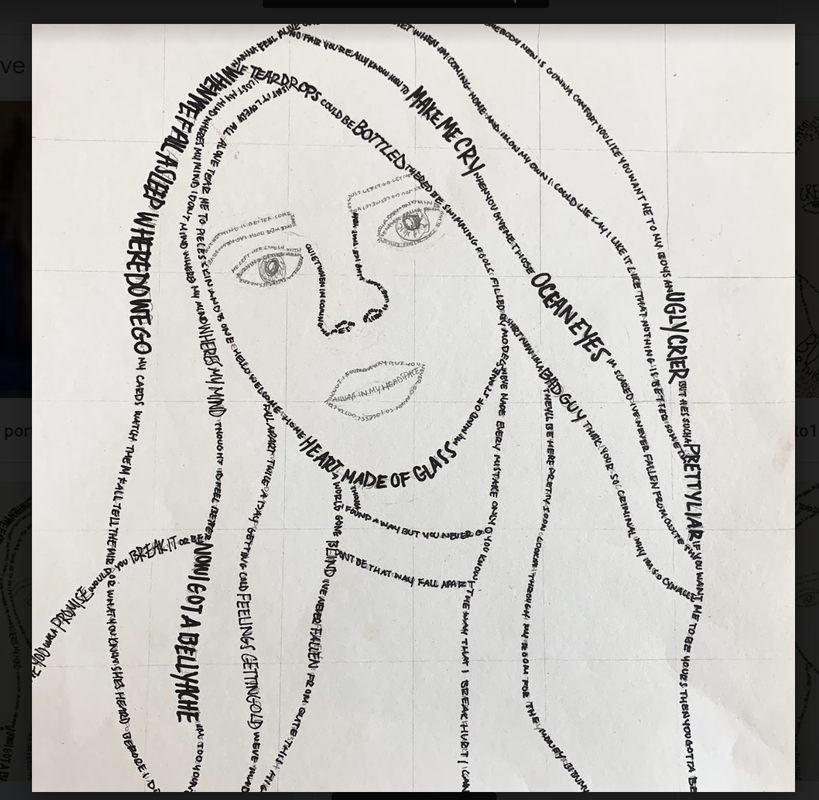
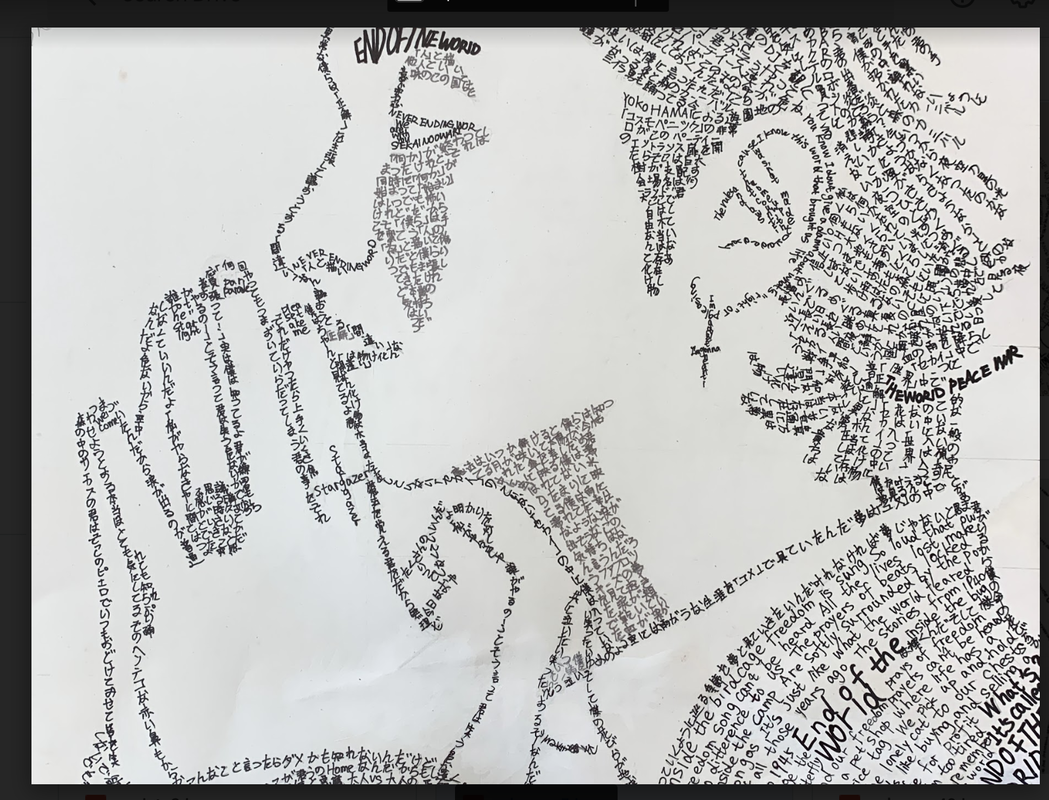
Favorite Lesson Plan: Micrography Portraits
Objectives:
Increasing observation skills, using black line and contour in design, using markers in drawing, and incorporating the theory and execution of typography into an artwork.
Art Supplies:
Black permanent markers (3 sizes) and a few gray tones, large drawing paper, access to printer, ruler and pencil.
Steps:
1. Have students look up their favorite musical artist or sports figure and print.
2. Graph the print into 1 inch squares.
3. Count the boxes and double for the size the larger artwork.
4. Students are to draw on top of the print and just the simple contour lines for
the areas of the face and hair.
5. Students should draw what is inside each correlating box from the print to
the larger artwork.
6. Students should draw lightly. Because all pencil will be erased.
7. Using a few sizes of black marker use words to go over the lines. Some
words will be small, medium, and large.
8. Use gray markers for shadowed areas.
Assessment:
Did the student use at least 3 size markers?
Did the student create a visually interesting portrait?
Did the students use the grid technique to blow up their picture properly?

Ashley L. Schick

|
Ashley L. Schick works in printmaking and paper arts. Her artwork has been exhibited nationally and internationally, has been installed in film sets, and is held in multiple private and university collections including Vanderbilt, University of Florida, Baylor, and the Renaissance Atlanta Airport Gateway Hotel. Schick was an artist’s assistant to sculptor Brian Dettmer and a resident in the Creatives Project’s Studio Program (2011-2013). Schick teaches in the Upper School at Lovett. She has previously taught many art workshops for students of all ages from children to adults, in collaboration with the High Museum of Art, Georgia Tech, SCAD, and as the Studio Program Director for the non-profit One Love Generation (2013-2015). In 2014, she was selected to be a part of the Georgia Center for Nonprofits' High Potential Diverse Leaders program. She has an MFA in Printmaking, where she also worked as the lead printer and constructor for Kiki Smith’s artist book Color Noise.
Teaching Philosophy: "Tell me, what is it you plan to do / with your one wild and precious life?" — Mary Oliver Web Site! www.ashleyLschick.com |
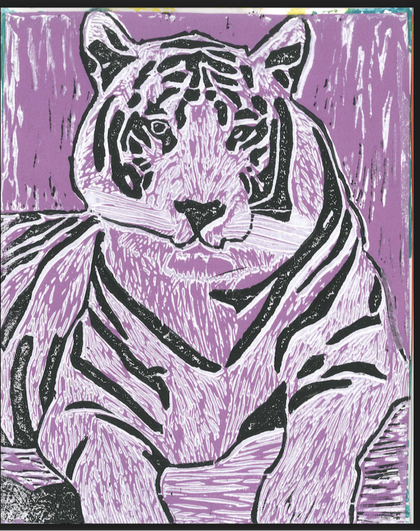
Favorite Lesson Plan: Reduction Relief Print Animals, Grades 9-12
Objectives:
Introduce students to the printmaking process. Address negative and positive space (carved and uncarved areas, printing and not-printing areas). Analysis and translation of shape, texture, and line in reference images. Identifying light, medium, and dark values. Finding copyright-free reference photographs. Introductory color theory.
Art Supplies:
Easy Cut Block (or Linoleum Block), Speedball Linocut tools, copy paper, reference image, block-printing paper or mulberry paper or rice paper, water-based block/relief ink, brayer, paper palette, baren or wooden spoon
Steps:
(1) Introduce Printmaking, relief prints from history, MOMA printmaking video, positive/negative, carved/uncarved areas
(2) Look for student-taken or otherwise copyright-free reference photos of animals (pets, zoo animals, endangered animals, native animals, etc.)
(3) Scale, convert to black-and-white, and print out images. (Invert images or "print emulsion down" if the orientation of the image is important.)
(4) Students trace major edges/contours of the animal on the front of the image in a soft pencil. Cut out photo to the size of the block.
(5) For Easy Cut block, place traced photograph face-down on the block and shade the back with a pencil. The traced lines should transfer onto the block. Trace lines in sharpie.
(6) Demonstrate safe carving techniques.
(7) Students carve out the lightest parts of their animal.
(8) Print in a medium color onto paper that is the same size as the block (at least 10 copies). Tape a paper palette to the table, put out a dollop of ink, tap the brayer in the ink, then roll out a separate smooth square of ink. Use this square of ink to charge the brayer to roll ink onto the block. Clean all materials when done. Let the prints air dry.
(9) Identify the dark areas remaining on the block. Carve away all mid-tones, leaving only the darkest areas raised/uncarved.
(10) Test print on a blank sheet of paper. If acceptable, manually register and print each previous print with the newly carved block.
(11) Title, sign, and number the top 5 prints in pencil on the back lower edge of the prints.
(12) Admire your awesome prints!
Assessment:
Students submit a variable edition of 5 prints, signed, titled, and numbered. Students write a reflection about the printmaking process, successes, things to improve, and "lightbulb" moments when everything clicked. Project Rubric Categories:
(A) Drawing and Transfer Qualities,
(B) Carving Qualities,
(C) Printing Consistency and Precision,
(D) Use of tools & classroom workspace.